All about Inventory
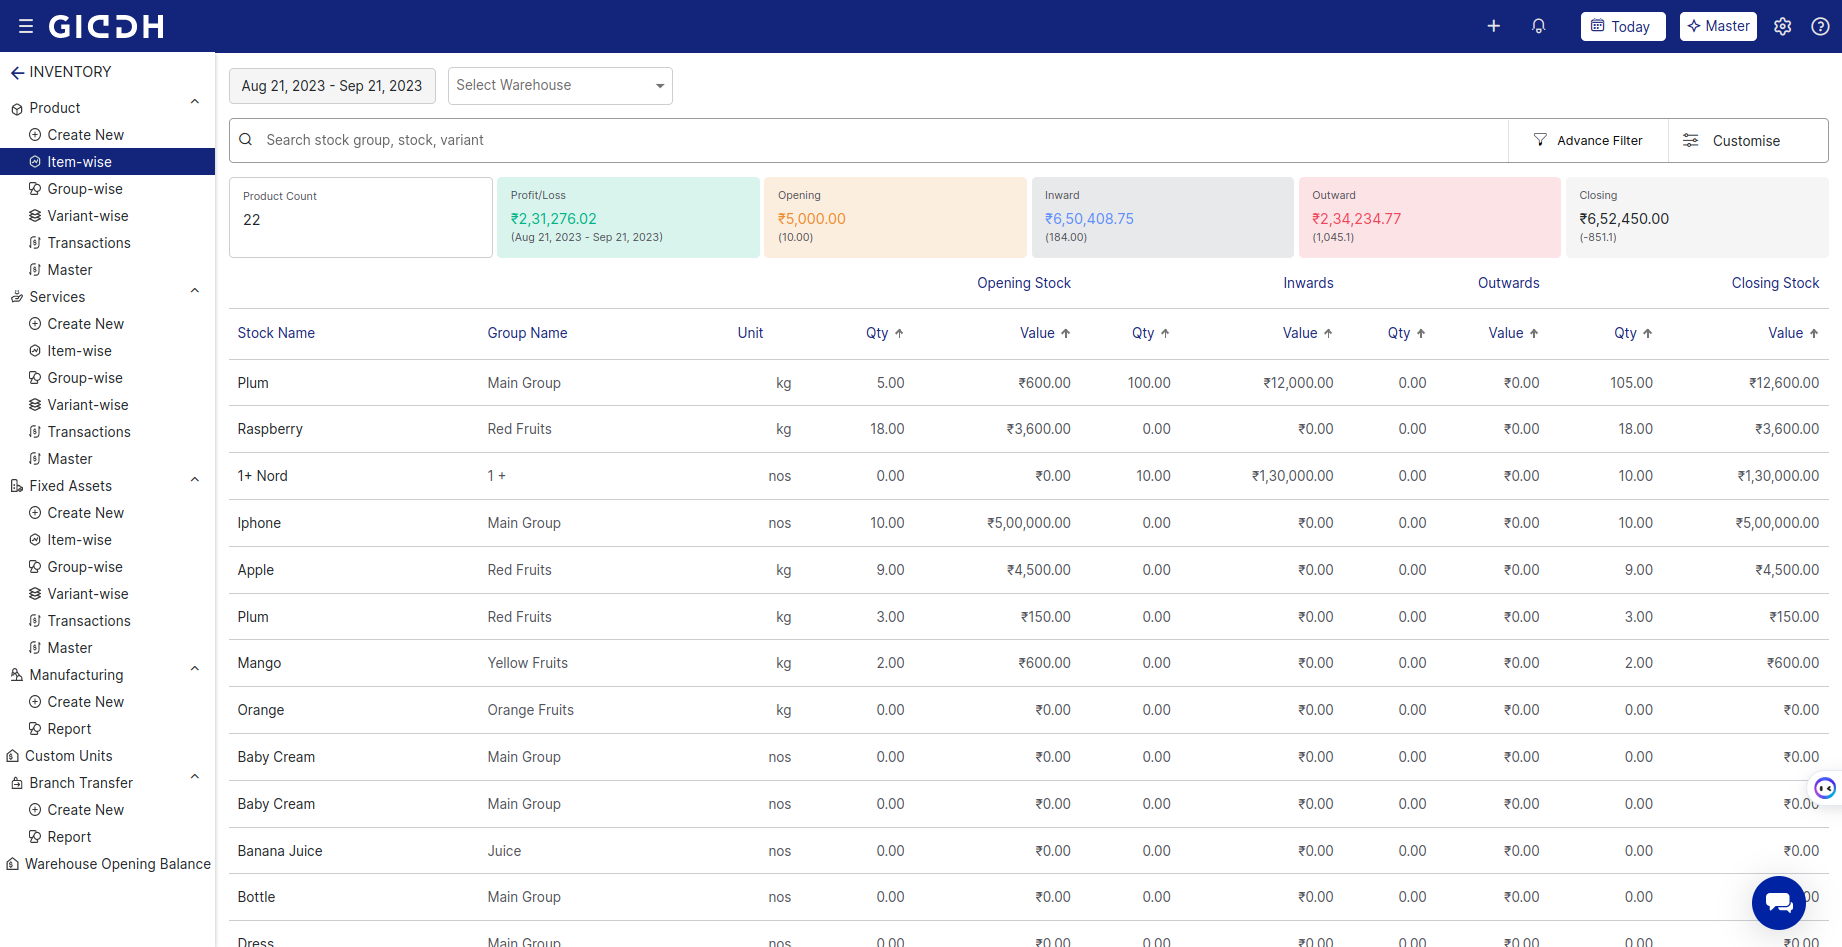
Every business, whether small or large, manufacturer or reseller, has to manage inventory for several purposes. Inventory management is about staying on top of your supply chain, reducing wastage and generating more profits. With GIDDH, you can Manage your entire inventory with minimal effort. You will find options for Inventory, Manufacturing, units, Branch and warehouse Transfers etc. in Inventory Management.
For Inventory in GIDDH either you can Follow Menu ---> Inventory OR you can directly search Inventory By ctrl+G, cmd+G or ctrl+K, cmd+K

 Inventory
Ideally, you should assign stock items to a group. This would help you organize and track them properly. You can create stocks and groups aswell In GIDDH.
Download -
You can get the reports emailed to you in various ways. One of the ways is to click on the Context Menu (three vertical dots next to Search Box) and then choose from the options. From there, you can get reports group-wise, stock-wise and account-wise. The other way is by clicking on the download button given at the top right corner of the grid. This will send you the required reports in the requested format (either CSV or XLS, as chosen by you) to your registered email address.
Create Stock
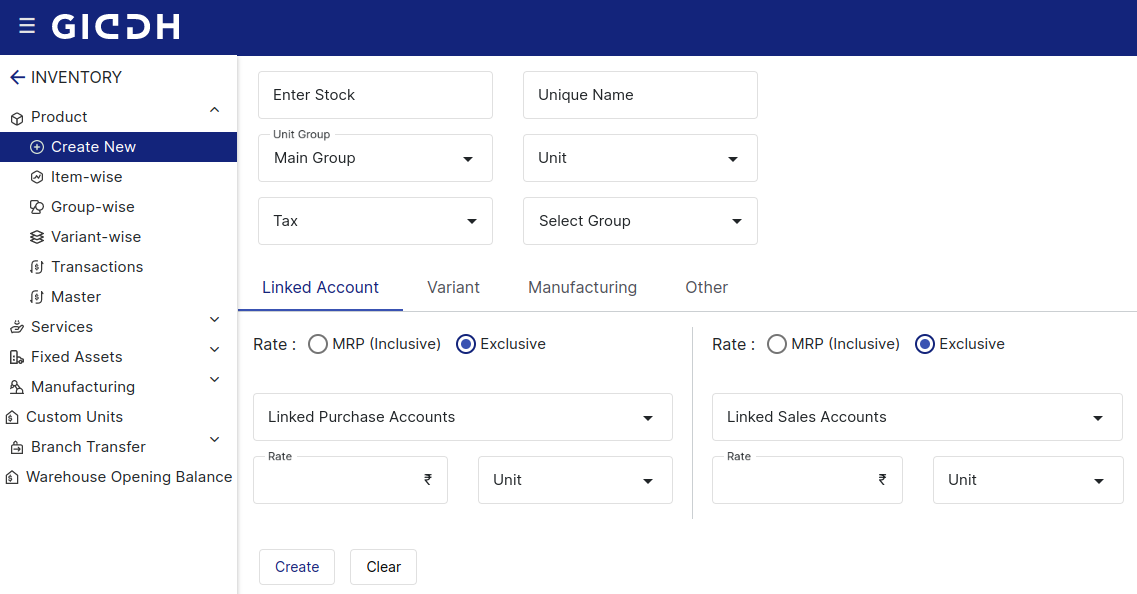
Stock can be anything that you store or maintain with for your organization. It can be laptops, chargers, water bottles, vehicles, gadgets, or anything else. To add stock to the accounting information, do the following:
- On the Inventory page, click on the Create New button.
- From the options, select Create Stock.
- An entry form with the following details appear on the screen:
- Under group: To assign a group to the item, enter the name of the group and pick from the options that appear here. If you do not find the appropriate group here, then first go and create a group from Create Group option on the Inventory page. This is not a necessary field.
- Stock Name: Enter the name of the stock.
- Stock Unit: Enter the unit you want to use to measure the stock.
- Other Details: These details are not mandatory but feeding them in will certainly help you organize your inventory better. Provide additional information like HSN code, tax, opening quantity, sku code, etc. You can also add a custom field if necessary.
- Purchase Information / Sales Information: Provide the details that best describe the item you are adding as stock.
- Is it a finished stock? (Manufacturing / Combo): Selecting this checkbox would imply that the stock being created is further made up of other items. For example, if you mention jeans here, then its ingredients would include thread, cotton, etc. The details are to be mentioned in the entry form that opens next. Also, after you select this, it starts showing in the Manufacture section.
- Save / Cancel: Click on the Save button to store the information.
The stock has been created.

Create Variants -
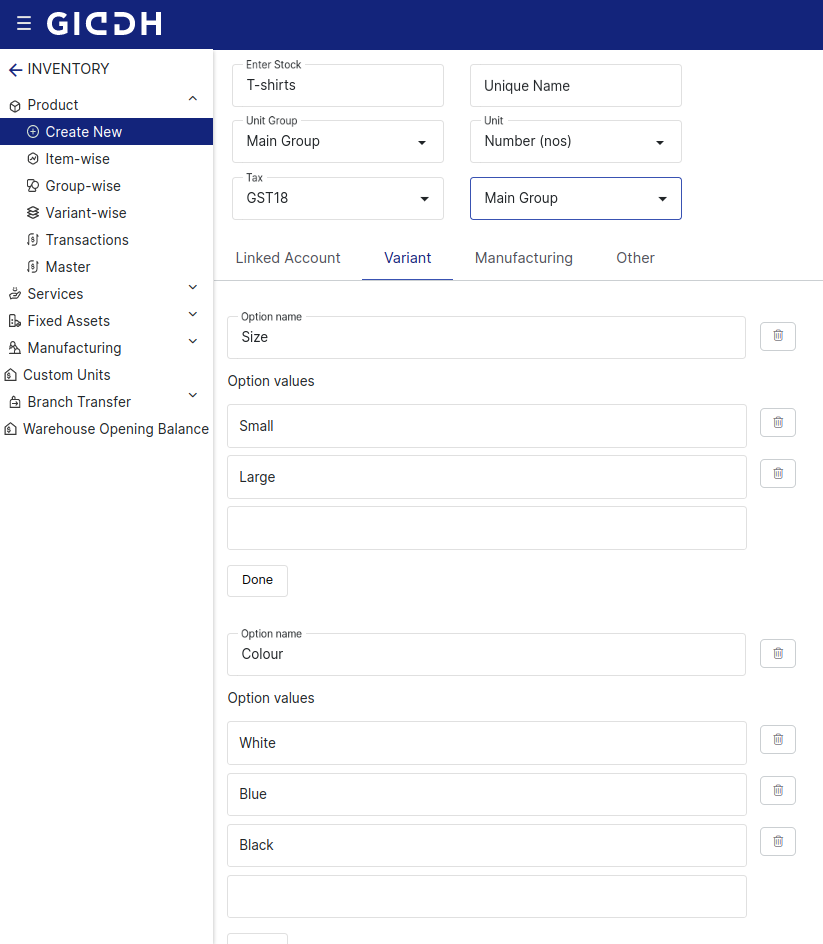
You can create the Variants of your stock in GIDDH fo that you need to -
- Look for an option to add variants or attributes to the item. This is labeled as "Variant".
- Click on the option name to add a variant , such as size, color, or any other relevant attribute.
- Specify the details in option values , such as Small, Medium and XL for size
- Click on done you will get to see a table in which you can different Units, opening quantities, amount and SKU code.
- Save the changes and your variants will be added to the inventory with their respective stock details.
Search -
Enter the name of a stock or a group and press enter. The filtered results are displayed on the page. Click on the Context Menu available next to the search box to get the records in CSV or XLS format. The records can be filtered group-wise, stock-wise variant-wise and Transaction-wise aswell.
Create a Group -
The purpose of forming groups is to organize information. By creating groups, you can easily club items that belong to the same category.
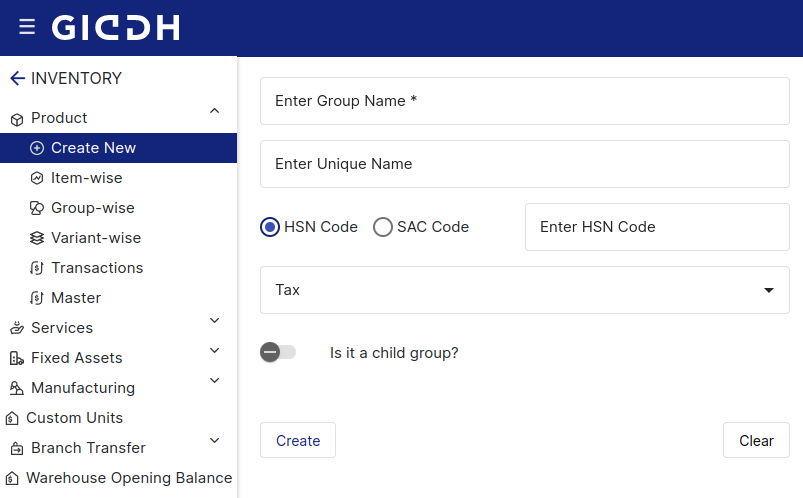
To create a group, do the following;
- On the Inventory page, click on the Create New button.
- From the options, select Create Group.
- An entry form with the following details appear on screen:
- Name: Provide the name of the group. The name should be meaningful and easy to understand so that other users can easily assign inventory stocks to it.
- Unique Name: It is picked automatically. You can edit it though.
- Enter HSN/SAC Code for that group if any.
- Is it a child-group?: Select the checkbox if you want to make it a sub-group of an existing group.
- Parent Group: This option becomes active only if you select checkbox for the above option. Pick an option if you want to assign a parent group to the sub-group you are creating.
- Save / Cancel: Click on the Save button to store the information.

Edit / Delete Groups
Existing Groups can be edited or deleted.
- To edit the group, locate it in the list of existing groups; click on its dropdown icon; click on the pencil icon; the details open in the upper side of the page; make changes in the entry form, and click on Update.
- To delete the group, locate it in the list of existing groups; click on its dropdown icon; click on the pencil icon; the details open in the upper side of the page; choose Delete; a confirmation message is displayed on screen.
Create Unit
Measurement Units are used to quantify material. Units created here can be assigned to stocks when you create them as part of the inventory.
- On the Inventory page, click on the Custom Units button.
- From the options, select Create Unit.
- An entry form with the following details appear on screen:
- Unit Name: Click into the field and pick from the options.
- Unit Code: This is filled automatically but you can choose it if necessary.
- Parent Unit: Pick a unit that can act as a parent unit to the unit you have chosen above.
- Multiply / Divide: If you have chosen a unit like a dozen, a carton, or something collective like it, please choose accordingly.
- Qty. per unit: Mention the number of items by which you want to multiply or divide the number units. This will help you in calculating the total number of individual items later.
- Save / Cancel: Click on the Save button to store the information.

Edit / Delete Units
Units that have been already created can be edited or deleted.
- To edit the unit, locate it in the list of existing units; click on the pencil icon; the details open in the upper side of the window; make changes in the entry form, and click on Update.
- To delete the unit, locate it in the list of existing units; click on the dustbin icon; a confirmation message is displayed on screen. However, you can delete this unit only after either removing it from all the entries or removing all entries containing it.
Import Inventory -
If you have stock data available with you in Excel or CSV format, you can move it to Giddh in a few simple steps.
- Press ctrl+G/cmd+G and search for import you will be able to see Import > Inventory.
- Either you can directly click on browse files option for uploading your Inventory or you can download the sample Excel or CSV file to see the headers and the sample data which will explain you How your data should be organized in Excel or CSV before uploading to GIDDH.
- Now simply upload it by using the Browse button.
A confirmation message is displayed on the screen.
Transfer Note
This form records the transfer of material from one hand to another. It can be done for tracking products transferred between branches, or people. Here are the steps to create the Transfer Note:
- On the Job Work page, click on the Create New button.
- From the options, select Transfer Note.
- An entry form with the following options appear on screen:
- Date: It is the date when the transfer is made.
- Product Name: Enter the name of the product being transferred.
- Sender’s Name: The person who has the ownership of the product or who has approved the transfer. Choose an option from the dropdown.
- Receiver’s Name: The person who is the intended recipient of the product. Choose an option from the dropdown.
- Quantity and Units: Enter details according to the product or material being transferred.
- Description: Enter the details of the transfer. It can be additional information to help track who ordered what.
- Save / Cancel: Click on the Save button to store the information.
Create Stock
Please refer to the Create Stock section given under Inventory at the beginning of this document.
Create Account
The account you create here will be visible when you select Person to filter information on the Job Work page.
- On the Job Work page, click on the Create New button.
- From the options, select Create Account.
- An entry form with the following options appear on screen:
- Name: Provide a name for the account.
- Save / Cancel: Click on the Save button to store this information.
 Manufacturing
On the Manufacturing page, you can filter items by name, date of manufacturing, voucher number, and parameters (like ‘less than’, ‘equal to’, etc.,) against a value.
You can also manage information about the manufacturing stats of the product.
